

Enjoy Textured Circles – a slight variation on Priscilla Hewitt’s Circle of Friends!
I used two strands of worsted acrylic to make this blanket and a size 10mm hook – yarn and hook are optional but will greatly affect final size. Mine is 16 motifs and 68″ square.
Note: This square is a slight modification of the Circle of Friends Square by Priscilla Hewitt (Ravelry).
Related posts:
Main Page for this piece (view Gallery or order custom piece) – here
Pattern for cute Mini version of this square – here
5-Round expansion pattern to make the square larger – here
Tutorial for the Flat Braid Join used on this blanket – here
Simple Lace join tutorial – here
Celtic Lace Join tutorial – here
Guide to weaving ends for this project – here
Let’s begin!

Chain 5 and join with a slip stitch to make a ring. SC, CH2 (counts as a TR) 15 TR in ring. Join with a slip stitch in the second CH above the first SC. Cut and finish off. This is the front side. 
Join new color in any TR. SC, TR in all TR around, squashing TR stitches to the front of the work. Squashed TRs make bobbles. Join with slip stitch to first SC. 16 bobbles, 16 SC. Cut and finish off. 
Join new color in any SC. (SC in SC, CH2, skip bobble) all around 16 times and join with slip stitch to first SC. Do not cut yarn. 
SC, CH1 in CH2 space (counts as DC), 2DC in same CH2 space, 3DC in all CH2 space around. Join with slip stitch to CH directly above first SC. 48 DC. Cut yarn and finish off. 
Join new color in any DC. Alternate SC, TR around, ending with a TR and join with a slip stitch to first SC. 24 bobbles, 24 SC. Cut yarn and finish off. 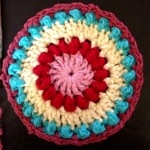
Join new yarn in any SC. (SC in SC, CH2, skip bobble) all around and join with slip stitch in first SC. Do not cut yarn. 24 CH2 spaces. 
SC, CH1 in CH2 space (counts as a DC), 2DC in CH2 space. **(TR, CH1) 2 times and TR again all in next CH2 space. 3DC in next CH2 space. 3SC in next 3 CH2 spaces. 3DC in next CH2 space.** Repeat ** section, ending with a final group of 3SC. Join with a slip stitch in the CH directly above the first SC. Cut yarn and finish off. 4 corners made by the TR, CH1 sections. 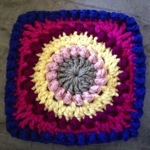
Join new color in corner TR. (SC, TR, SC) in all corners, alternate SC, TR across all sides including CH1 spaces as a stitch. 44 bobbles. Cut yarn and finish off. 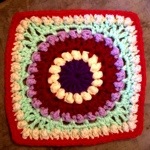
Join new yarn in corner bobble. 3SC in all corners and SC in all SC and bobble stitches around. Join with slip stitch in first SC. Cut yarn and finish off. 
Join new color in corner SC. SC, CH1 in corner SC (counts as DC). CH1 again and DC all in corner SC. DC in all SC around, working DC, CH1, DC in corners. Join with slip stitch in CH directly above first SC. Cut yarn and finish off. 
Join border color in corner space. 3SC in corner SP. SC in all DC around, working 3SC in corners. Join with slip stitch in first SC. FIRST MOTIF: SC in corner SC, CH4, SC all in corner SC. (CH2, skip 1 SC, SC in next SC) all around, working SC, CH4, SC in all corners. Join with slip stitch in First SC. Cut yarn and finish off.
Using “Flat Braid Join”, work subsequent motifs in the same manner.
When all motifs are joined, work CH2 spaces all around border of blanket, decreasing 2 spaces together where two square corners meet (Internet Search “No-crinkle granny square border” for a great tutorial) and working SC, CH2, SC in 4 corners of blanket.
Work a round of 2SC in all CH2 spaces, working 3SC in all 4 corners.
Work a round of reverse SC (crab stitch).
Finish off and take some snazzy pics! 🙂
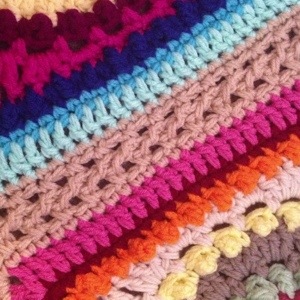
Close up of join.

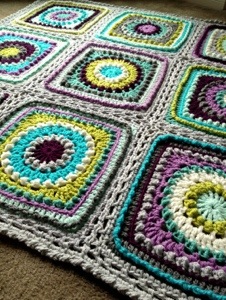
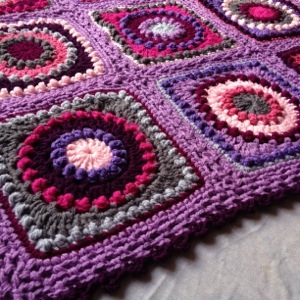
Two other Textured Circles blankets.

Hi Rachele!! Gorgeous blog. I don’t see the free pattern for the textured circles. Is it only visual?
Hi, there! Just finished writing up 😉 Thank you! Enjoy! Flat braid join tutorial coming soon, but Internet search will help.
Oh, and here is the pattern! I have pinned it for future reference. Thank you.
🙂 You’re welcome! Have a lovely week. – Rachele C.
Beautiful!!!
Beautiful. I cannot find the written pattern. Loved the pics of it done with different colors.
Please share a pattern we can copy/paste! I love it! Thank you!
Never mind-I figured it out. It’s amazing!
Hi there! This pattern is written in UK or US terminology?
Thank you for the inquiry! US terminology 🙂
Thank you! Your blog is great!
I enjoyed this post. Your site is gorgeous! I am now following you.
I noticed there was some discussion about the print-ability of this pattern. The “more ” button that has a multitude of choices available with print being one of them. Also, on Chrome when I select print there is a choice to change from the printer to PDF and then choose save. This saves to the “download” function where you have the option to name the file. If you need more information WordPress provides tutorials.
I hope this helps and I apologize that this comments is so long. Please come over and visit my blog. All comments are especially welcome.
Ta Ta for now, Cathy the Bagg Lady
http://raggz2baggz.com
What is “squashing” …is it when you work on the back post of the stitch below??
The stitch is worked normally, but if you don’t “squish” the TR to the front of the work, you will notice that the TR “bobble” tends to more naturally end up at the back of the work. I wrote it this way because I didn’t want to have you turn the motif at all. I hope that makes sense! Let me know if you have and other concerns. 🙂
I love the look of this pattern and definitely am going to try it next 🙂 thanks for sharing 🙂
Awesome! Nice to see you here 🙂 “Happy hooking”!
RC Xx
Lovely pattern but I am still having a problem with the pattern. On line 8 of your instructions it says you should end up with 44 bobbles. I keep ending up with 41. I have checked the previous row and have the right amount of stitches. There must be something I’m not doing correctly at the corners. Any suggestions would be gratefully received. Thank you
Hi! 🙂
On each “side” of the motif, you will have 10 bobbles, plus 1 in each corner for a total of 44. You’ll be working sc, tr, sc in each corner.
Put another way, your repeat for the 4 sides is as follows: **(sc, tr, sc) in corner, tr, (sc, tr) 9 times across**
Hope that helps! I’m writing up 2 great lace borders for the motif, so stay tuned and maybe you’ll fancy one for your blanket 😉
Rachele C.
Hello!! Thankyou so much for this beautiful pattern! I found it once and forgot to bookmark it, after thinking about it for all this time, I’m so glad to have found it again today! Now bookmarked and will try the pattern tomorrow! Thankyou!!!
Fabulous! Happy hooking to you! 🙂
Rachele C.
Hey there outstanding blog! Does running a blog similar
to this require a great deal of work? I have no understanding of computer programming but I was hoping to start my own blog
in the near future. Anyway, if you have any recommendations or tips for new blog owners please share.
I understand this is off subject nevertheless I just had to ask.
Thank you!
It takes some attention, and I don’t have much computer knowledge. I started this website on a MUCH simpler wordpress blogging theme, then I slowly worked my way to the current theme little by little. I still make changes to it as I learn more about creating a website. I like WordPress.com, but of course any platform has its limitations.. Lots of luck to you! 🙂
Can this motif be worked w only 1 yarn or is 2 required to get the great texture/look? I’m just guessing it’s probably pretty heavy- ?? Thank you! Your work is beautiful 🙂
The texture is still beautiful if you do 1 yarn strand only.. I have done some this way – check out my category “Textured Circles” to see the different ones I have made. It is a heavy blanket double stranded with worsted weight yarn, but not too bad with sport weight or Dk weight! I like to use an N hook (9mm) for DK weight doubled..
Good luck to you! 🙂
Me gustan mucho sus mantas,más que ningunas,pero me gustaría tener el patrón en esquema para que me quede perfecto.
Lo invente pero basado en uno que se llama “Circle of Friends” – es gratis.. Y el mio esta ubicado aqui en este sitio. A la izquierda haga clic en “free patterns” -> “blankets” -> “textured circles”
🙂 suerte!! Si le pueda ayudar, mandeme correo a babylovebrand@gmail.com
I can’t figure out how to squash the tr. Also, by tr you mean tripple crochet right?
Hello! What it means by squash it is that if you don’t push the tr to the front of the work, it will naturally end up in the back. So all your bobbles would be on the wrong side of the piece. Also yes, it’s a treble crochet.
Thank you! Have fun! 🙂
I found “squashing” the bobbles to be tedious (the junky yarn I was using may have had something to do with it though). I noticed on the original pattern, that you’ve linked to at the top of the post, it says to “turn” the work before each bobble round and then turn it back after. I’ve been doing it that way now and I find it so much easier! My question though – is there a reason you don’t want to turn yours? Does it effect the look of the final square in any way?
Thanks so much for sharing this pattern, along with all the beautiful photos of your work! So inspiring!
Yes the original instructions are to turn the work. I for some reason have a stubborn aversion to turning in this particular pattern! My favorite granny square pattern involves turning on every single round, so I really have no idea why I don’t like turning on this… Just one of those weird things I suppose! 😊😊 Thanks for the discussion, and craft on! 🌺❤️💕
Hi, I just started this and want to check is it in us or uk terms? There seem to be a lot of trebles which is why I ask. Love your work! Thanks 🙂 Janette
Hey there! Everything of mine is in USA terms – the US trebles are there to make extra “tall” stitches that stick out as Bobbles when placed next to short US single crochet stitches. If that makes sense! Haha 🙂
Awesome, thanks!
Hi from Turkey , love your work. cant see the images. woult be lovely if you fix that. thanks…
Looking for …continuous join as-you-go instructions.
Can you help?
Hi I would like to know if there is another stitch I could use instead of the trebel stitch? I cannot seem to make mine look as good as yours does I have made two and both are not right I have tried to squish them but they are still going to the back. I have even tried pulling them to the front and they still will not work. The second one I made I did a cluster stitch instead of a trebel but it does not look right either. Could you please make a suggestion on how to solve this problem. You have been most helpful with all of the patterns. Thanks so much for your patience.
Brenda
Hi! 🙂
I know you may be having trouble with the Treble stitch itself, but as far as it gong to the back, the original pattern calls for turning the work on treble rounds so that you’re working on the back of the piece and when the Treble sts go to the “back” of the work, they’re actually ending up on the front.
But! If you don’t like how your trebles are coming out, then I’d suggest maybe working DC for the bobble and just slip stitch for the SC? You’d still have a big height difference but the bobble may come out too small – you may still consider turning (flip over to wrong side) your work and doing the bobble rounds that way, so your bobbles end up on the front with little effort.
God luck to you! If you’re considering trying to improve your treble sts, here’s a tip: make sure when you wrap your yarn around the hook, that the wraps are all tight around the tip of the hook before you begin yarning over and drawing the yarn through to make the st. So instead of being spread out toward the “neck” of the hook, your wraps will be together at the tip of the hook. This way the TR won’t come out loose.
Anyway, happy crafting! 🙂
Rachele C.
Hi I would like to ask you if you could tell me what an alternate single crochet is?? I have looked all over the net and could not find out how to do it. Does it mean to go into the front stitch one time then the back stitch the next? Thanks so much for the pattern I have found out that all your yarn must be the same ply because the bobbles will not stand up well with thinner yarn. If there is a place on the net where I can learn the alternate single crochet that would be great I love learning new stitches.
Brenda
I think you’re referring to the “alternate SC, TR all around” – this just means alterNATE (not ALternate) between the two stitches (SC, TR) to make the bobbles all across the 4 sides.
I do like worsted weight yarn, but I have used DK yarn and a size 5mm hook and the bobbles stand up fine. You could also do as is called for in the original pattern and turn your work on bobble rounds. If you do this, you don’t “squish the bobbles to the front” because they will naturally end up on the other side (the right side) of the piece this way.
Thank you! Hopefully I explained clearly enough! Happy crafting – RC
HI I tried making bubble with Tr and my Tr are neither back nor front of my work they are tall and standing. How do i make a bubble with that ? Could you please tell me what squashing TR means. If any pictures or video that you can share.
Thanks,
Mamatha
Hi there! It’s a USA Treble – so wrap yarn around hook two times – as opposed to USA DC where you wrap yarn around hook once.
When you work the US Treble in between 2 SC stitches, it sits “squished down” in the middle, acting as a tiny bobble. You need to make sure the TR “bobbles” to the front of the work so you’ll have to push it forward, because it’ll tend to end up at the back.
Or alternatively, you can work the bobbles rounds with wrong side of work facing, that way they go to the “back” which will really be the right side.
I don’t have videos, but try searching “make bobble with SC, TR stitch” – that might work!
Hope this helps! Happy crafting to you! ❤
️Rachele C.
Hi ,
Thank you. I missed on the SC stitch. Now I got the Bubbles. I have 5 different colours of aran weight yarn 100 gms ball. will it be sufficient to make a baby blanket ? I am using only one strand. I will use one of the colours as joining colour.
Thank you for a prompt reply. My project just started a few min ago and it looks fabulous.
Thank you.
Mamatha
That’s great! I think 5 100g balls will make a small size baby blanket – but it should work! I’m glad you’re enjoying the blanket! 🙂
– Rachele C.
If i want to make a good size blanket how many i would need ????
I would say 9 – (3×3) it will end up about 34x34in with the joining and a simple border.. Each square should end up about 10in.
Thank you Rachele. I did the first square and it looks amazing with out the border colour rounds it is 7 inches. Thanks a lot for such a wonderful pattern. I am really enjoying making it and I am sure the final recipient will be also happy with the blanket. I will share the Pics once I get my Camera battery charged.
ta,
Mamatha
Hi Rachele,
I have made 6 squares till now and they are looking great. I have been looking through the pictures of your blankets to get inspiration for the joining colour. Blanket Number 19 cached my eye. I really liked the border. I Couldn’t find the pattern anywhere. Is it a free pattern ? If yes could you please help me with a link.
Thanks,
Mamatha
Thank you so much and that’s great! Here is the pattern for that border – I called it “playful lace scallop”
Thanks again and happy crafting! 🙂
Rachele C.
Thank you 🙂 You are awesome
No you ahh 😝👍🏻❤️
I had just down loaded this beautiful Threaded Colors Chevron, but am having trouble getting the half granny triangle to look like the picture, and followed the directions, need help as if I can’t get this basic right I will not be able to do the chevron design blanket like the picture, help?
Hi there! Please email CypressTextiles@gmail.com with a photo of your attempted triangle and I’ll assist any way I can. Thank you! – Rachele C.
I am having a difficult time trying to get the half granny triangle to look like the picture in her directions I just downloaded, on the chevron blanket, help please? Maybe a video?
sent out email 2:00pm today.